|
|
Post by mcdaidjp on Jul 2, 2009 10:20:22 GMT -5
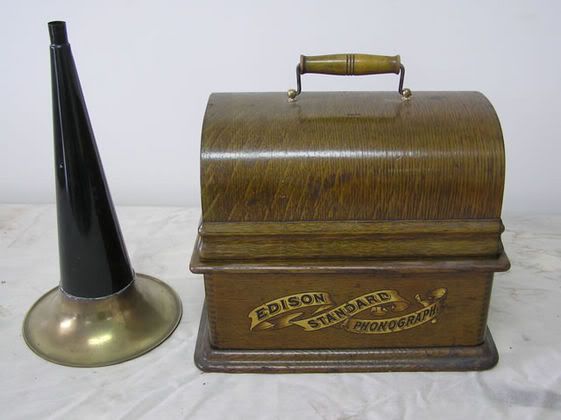
Alright, you all have been great in helping me with the Standard, and now I'm onto my next few issues. Since my reproducer has been brought back into working condition and wonderfully restored, it's time to play. However I have a few bugs to work out.
1. The feed screw has oil and dirt built up between the threads and I need to find the best way to clean it up.
2. When the reproducer arm (part that slides along the straight edge) reaches the starting lever they hit. Could it be that the starting lever is too long? Or the piece (I don't know the exact name) on the reproducer arm is wrong or not set properly?
3. I need to get the speed set properly. It runs fine without the horn, but it is too heavy to run with the horn on it. Any places I should start first?
Those are my next battles. It may sound easy for seasoned veterans, but I'm struggling with it. But then and again, that's why I love this little thing.
John
|
|
|
|
Post by martin1 on Jul 2, 2009 15:22:48 GMT -5
Hey John.
The on/off lever on my new style case Standard A, sticks up 3/4" above the bedplate. On mine, the Reproducer carriage passes behind the lever by about 1/16". The presence or absence of motor mounting rubber washers will affect the positioning of these somewhat. Another possibility is that your lever got pushed back a little. Make sure that everything else is positioned right before trying to re-bend the lever.
Your feedscrew issues and the inability to run with a horn are probably related somewhat. These machines really weren't engineered with a lot of extra power. Dirty gears and mainsprings will slow things down. The 14" horns sitting on the reproducer really give extra drag.
If you don't mind taking apart the topworks, you can free things up quite a bit by removing the top gears and bearings and giving them a bath in Laquer Thinner. Use an old toothbrush to clean the gear teeth. (Don't use a wire brush.) This will require a bit of adjusting to align things again afterward.
The other approach is to repeatedly wipe down the feedscrew in place with paper towels soaked in paint thinner. Be sure to protect the bedplate and cabinet. Then coat it with very light sewing machine oil. If that cures it, great. If not, then it's probably better to go into things more thoroughly. I've sometimes found that by lubing things up and operating things for about a half an hour or more will tend to free things up. A very light coating of oil on the straight edge will also help.
Good luck and keep us posted!
Martin
|
|
|
|
Post by maroongem on Jul 2, 2009 15:48:48 GMT -5
Hi John, I took a look at the pix you posted of your machine and the reason the lift lever is striking your motor switch is because the lift lever is possibly incorrect for that carrier arm. I haven't seen a later A bedplate and cabinet like yours with a lift lever. Usually they have the knurled push/pull knob for lifting and lowering the carriage arm. The earlier As in the square cabinet will have this lever but the bedplate is slightly different. If you can remove the feedscrew, soak it in mineral spirits (turpentine) and clean the threads with an old toothbrush. Do not use any type or wire brush as you may damage the threads. You may have to adjust the two screws that attach the half nut to the bar and wiggle it around to make a good contact with the feedscrew after you clean it. Also clean out the threads on the half nut as well. Bill 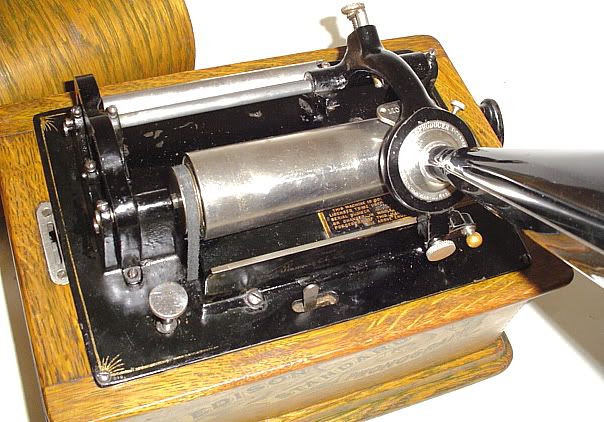 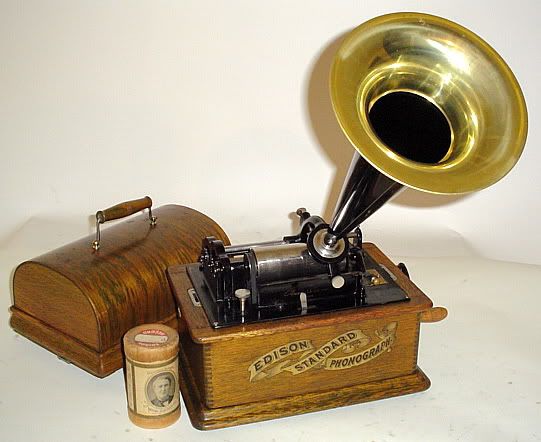 |
|
|
|
Post by martin1 on Jul 2, 2009 18:03:55 GMT -5
Hey John,
I think I've got it. Bill's idea of reviewing your original photos was a good one: I didn't remember that you had a lever lift. However, I don't think that the reproducer arm is wrong, so much as I think somebody flipped the lift lever around the wrong way. Try undoing the screw holding the lever on, turn the lever around so that the curvy part is pointing up and see how that works. I had a similar problem on my Standard Model C, (an International Correspondence School machine with a lever lift). Yours looks to be the earlier version of the new case Standard A. I'm guessing that your machine's serial # is about 90,000 or earlier? Anyway, try that and report back. (I'm dying to know if I nailed it or not.) Good luck!
Martin
|
|
|
|
Post by maroongem on Jul 2, 2009 21:32:49 GMT -5
Hey John, I think I've got it. Bill's idea of reviewing your original photos was a good one: I didn't remember that you had a lever lift. However, I don't think that the reproducer arm is wrong, so much as I think somebody flipped the lift lever around the wrong way. Try undoing the screw holding the lever on, turn the lever around so that the curvy part is pointing up and see how that works. I had a similar problem on my Standard Model C, (an International Correspondence School machine with a lever lift). Yours looks to be the earlier version of the new case Standard A. I'm guessing that your machine's serial # is about 90,000 or earlier? Anyway, try that and report back. (I'm dying to know if I nailed it or not.) Good luck! Martin Martin, Forgive me, but by the time the STANDARD Mod.C came about the lift lever was way long gone and as far as I have seen the push/pull knob was standard. Not to mention the swing arm was discontinued by this model. Bill |
|
|
|
Post by martin1 on Jul 2, 2009 23:49:45 GMT -5
Hi Bill! You are correct. The last normal lever lifts seems to disappear on the Standard right after the New Case Model A was introduced. (Somewhere about serial # 90,000 give or take a few thousand). However, we're both right on the Model C. The reason my Model C has a lift lever is that it was sold as part of a Correspondence Language Course. Edison supplied Standards to the International Correspondence School of Scranton (ICS) with 3 main modifications: Speed Control on top (school cylinders ran @ 90 rpm), repeating mechanism (for moving back a few seconds) and a lever lift. It looks to me that the normal button lift would have interfered with the repeater's operation. Usually they will have a little celluloid tag with the ICS name. The earliest ICS machine I've seen yet is a New Style case Standard A and the last one is a Standard Model D (in the 820,000 range). So far, they've all had these 3 characteristics. Here's a picture of my Model C (serial # 803508): 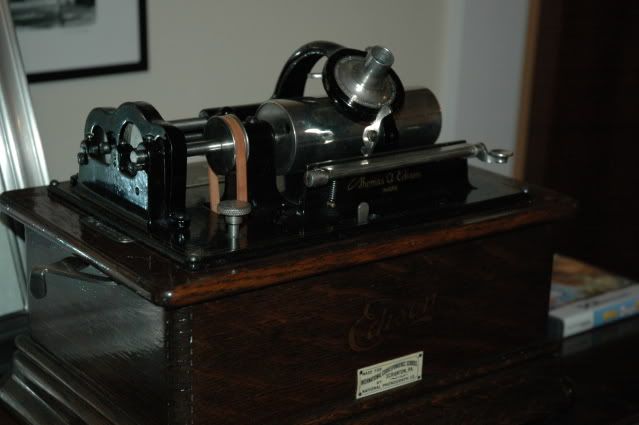 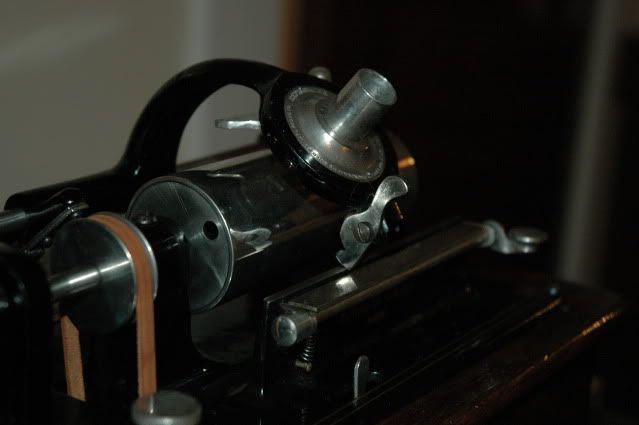 I think it's a cool machine, but I don't know how much French I'll learn with it.  By the way Bill, I like your Standard A. Would you care to let me add it's data to my excel database? I'd be happy to email a copy of it to you. (That goes for you too, John). My regards to you both. Martin |
|
|
|
Post by maroongem on Jul 4, 2009 17:22:02 GMT -5
Hi Martin,
You are correct about the ICS carriage arm using the lift lever as opposed to the push/pull knob due to the interference with the lift bar.
You'll notice that your arm has the hole drilled for the knob if used for a non ICS machine and that the lift lever was added but is on the opposite side of where the lift lever is normally positioned.
My very 1st Edison cylinder Phonograph was a Mod. A with the ICS attachment that I bought over 30 yrs. ago. Unfortunately, I had no idea what this add on was for at the time and the celluloid tag meant nothing to me. This was before the internet and the vast number of reference books that are now available. Everything I learned in those early days was by actual hands on experience! That machine is now long gone, as well as many others that have passed through my hands over the years.
The A that I have depicted here is not mine but one that I grabbed off the net for illustration purposes. The only STANDARDS I presently own are 2 Mod. Bs. One that is in great shape and the other that needs restoration.
I do think that Mcdaidjp's carriage arm belongs to an earlier A as his machine shows no evidence of being set up and used as an ICS machine.
Bill
|
|
|
|
Post by mcdaidjp on Jul 9, 2009 8:17:15 GMT -5
Sorry for the delay in replying. I hope everyone had a enjoyable fourth. I have cleaned up the feed screw and the half nut, both are now functioning well. I can now put the horn on without any issues in it stopping the mandrel. Finally (you'll laugh, I did) the lift lever was upside down. I did a lot of laughing at myself these last few days. I was reading Eric Reiss book and it said something along the line of... it was originally put together by hand, not magic. I just laughed took a deep breathe and started over. Once I did that it started coming together. I am learning to make very minor adjustments and test. I've found if I make more than 1 adjustment at a time I am bound to over-tighten or counteract each adjustment. Since I always have them, I'll leave you with another question. The wood cover is wanting to detach (unglue) itself from the end caps. What is the best type of glue to use? I say glue because I do not see anything screw holes or nails. Also you will notice the bottom right corner of the base is split along the backside. My guess is after so many years of lifting the motor/baseplate weight it eventually split? It's not bad but I don't want it to get worse. Any suggestions? 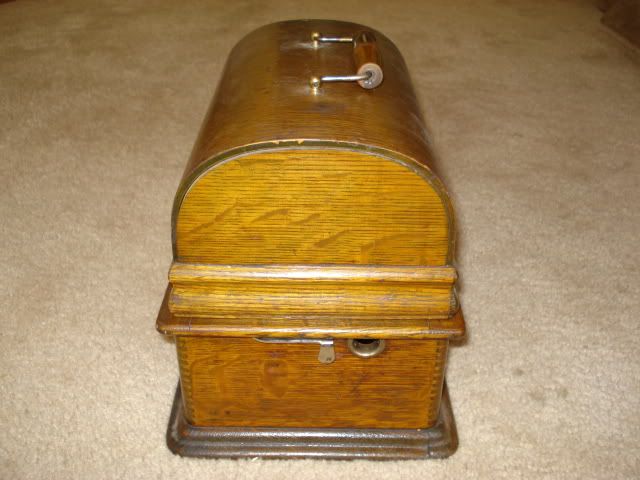 |
|
|
|
Post by maroongem on Jul 9, 2009 19:12:43 GMT -5
Happy to hear that you are working things out and that the mystery of the lever is resolved. What is the serial # of you machine?
A far as the lid coming apart, that was glued with hide glue at the time.
With clamps and newer glues, you can repair this with much less hassle. As far as the base coming apart, age and moisture has probably caused the separation. IIRC, there are 4 wood screws and (3 sections of the base) that hold the base to the case. You may have to remove these and then re-glue the bottom piece using clamps. I have seen the base pieces strengthened with those "waffle" shaped wedges that were driven into the sections. I don't know if this was factory or a later repair though.
Bill
|
|
|
|
Post by martin1 on Jul 10, 2009 2:11:42 GMT -5
Hi John.
I just wanted to chime in on the wood issues. I wouldn't worry too much about the base cracking. Much of that was probably caused by temperature extremes. That kind of checking is typical for things stored in a garages or unheated rooms. If you keep it in a temperature controlled environment (such as the one you live in), then it's probably stabilized. Many of the bases of the Standard Model A s that I've seen have this problem to some degree. (Mine is much more cracked than yours.)
If the lid end is only slightly loose, I'd leave it alone. If you do need to glue it, as Bill said, you can do the hide glue thing or try one of the other modern glues. (I've been using polyurethane glue recently and I like its ability to span gaps.) The big problem about gluing is the potential to mess up the finish. Since nobody carries their machines by the lid handle anymore (very dangerous), then it doesn't have to be a super strong join. More stuff to think about. Glad to hear you're making progress.
Regards,
Martin
|
|