|
|
Post by tarheeltinkerer on Feb 9, 2009 14:10:41 GMT -5
I have two Standard Ds coming in and I just can't figure out how to remove the 2/4 gear. The screw refuses to budge (I'm going to try some penetrating oil in a bit) and I don't want to force anything for obvious reasons.
Ideas anyone?
Secondly, what is the best modern method to clean the original black finish? I don't want to damage it since there are no chips (just wear on the decals and pin striping) and I just wanted to clean off old grime and polish it up. Reiss mentions literally soap and water, but I'm leery of this if I can't get the gear mentioned above removed. Suggestions?
|
|
|
|
Post by martin1 on Feb 9, 2009 17:04:31 GMT -5
I'm sure others have their favorite solutions to this, but I use "Fantastic" in a spray bottle, paper towels & elbow grease. Three things to watch out for: 1: Always spray onto the paper towels, not on the bedplate. 2: It will soften up the grime as you polish, but it will also soften up the shellac over coating (and the enamel underneath), so go easy with the stuff. (You may have to let it dry somewhat before giving a good final polish.) 3: Be very careful when cleaning over stripes or other decals. There may be no protective finish left over them, so go slow and be ready to stop as soon as it looks like it's going too far. (This is a good reason to start on a part of the bedplate that is harder to see.) I've sometimes resorted to 0000 steel wool & a very little paint thinner for really, really stubborn stuff, but it's really hard to control how much you take off. Also the paint thinner won't affect the shellac much but it will mess up the Enamel underneath, so be real careful. I generally end up using a very little bit of white auto body polish on a moistened paper towel, followed up by a coat of car wax. The One Big Caveat is go slowly, and be ready to stop if it looks like you're going too far. As you know, refinishing a bedplate is a real bear. It's really, really hard to make it look original. I've just been through that as well. If you'd care to look here's a link to the thread on Moooperator's message board: http://victrolagramophones.proboards.com....play&thread=141 I don't know if this helps, but here is how I remove the 2&4 min. gear: 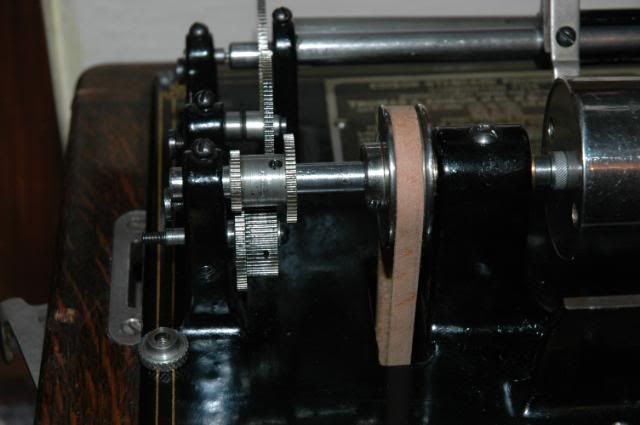 Remove thumbscrew 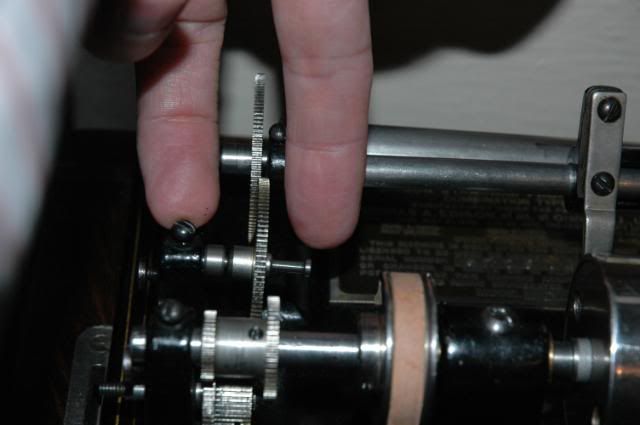 Loosen setscrew on intermediate gear, pull out pin & gear 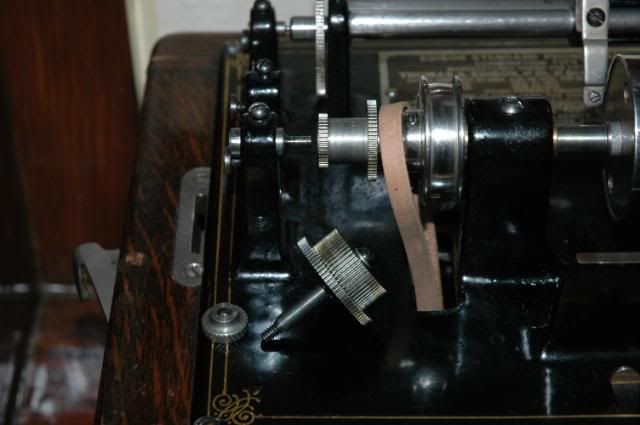 Loosen belt pulley set screw & pull mandrel shaft to right in order to clear 2&4 min gear Good luck with your "D" and keep us posted on your progress! Martin |
|
|
|
Post by tarheeltinkerer on Feb 9, 2009 17:30:09 GMT -5
Woohoo, got the gear off, but that spring clip busted off  |
|
|
|
Post by martin1 on Feb 9, 2009 17:52:34 GMT -5
Hmm, that's funny: mine doesn't even have a spring clip! Is this on the 2&4 min gear?
|
|
|
|
Post by maroongem on Feb 9, 2009 17:59:08 GMT -5
I was wondering the same thing. Which spring clip?
Bill
|
|
|
|
Post by tarheeltinkerer on Feb 9, 2009 18:07:32 GMT -5
Hmm, that's funny: mine doesn't even have a spring clip! Is this on the 2&4 min gear? On the 2/4 gear...there is a flat part on the shaft where this spring sat. |
|
|
|
Post by tarheeltinkerer on Feb 10, 2009 1:26:47 GMT -5
Thanks for the help yall. I need to buy a new mandrel bearing, as the pot metal one was swollen and cracked. I removed it piece by piece and guess I need a brass one now. I reassembled the top part and am now working on the motor. The governor almost looks like it is original, and different than the one on my Standard B, and the parts Standard D I have. Most peculiar. I'll get photos up in a bit...for tomorrow I just want to get the motor disassembled, cleaned, and reassembled.
|
|
|
|
Post by rfenergy on Feb 10, 2009 20:17:22 GMT -5
The little flat spring on my D was broken as well.What I did was cut a piece of spring from a pocket watch main spring to fit.It worked very well.I had to try a few different springs to get the tension right.The spring just helps the gears stay in the position you have selected.
Jim
|
|
|
|
Post by tarheeltinkerer on Feb 10, 2009 22:41:41 GMT -5
All I'm largely doing on this unit is cleaning it and refinishing the case. My Mom and Dad bought it (ebay find) and I'm just going to get it running. The original finish is worn but still in great shape so I intend to leave it alone for the antique look rather than make it look like new. Here are some before cleaning and after cleaning photos:  Motor Before  Motor After. This is the first time I have ever completely disassembled a motor (governor included) to clean it and reassemble it. I think it came out well.   Bedplate and Top Gearing Before    Bedplate After. Really this came down to degreasing and polishing. The previous owner took good care of this unit (it came out of an estate sale according to the auction). The case finish is poor, but it came complete with all but the reproducer (the top is here...it's original, but it is missing the tailweight, stylus, etc. etc.), and one of two small screws. I need to buy a new mandrel bearing (hence the piece of rag), a reproducer locking screw, and a new case decal to have it all together. I should have the case fixed up this weekend. The best part is that the lid has the entire label for changing reproducers intact and in great shape! |
|
|
|
Post by martin1 on Feb 11, 2009 2:18:24 GMT -5
Hi Tarheeltinkerer! That's a splendid polish-up on the bedplate! I see what you're talking about on the governor. I've got that on all of my later Standards. I'm not quite sure what the modification was for. (Maybe to avoid patent problems?) Can you confirm that the reproducer diaphragm is the shellaced rice-paper type rather than mica (or something else)? If so, that's the first time I've run across that on a C or H reproducer. I'd heard that the company fooled around with different types, but I've never seen this before. If you haven't started stripping the case yet, I encourage you to try to save the finish. My model C machine's case was in about that condition and I was able to gently clean it with paint thinner and very fine steel wool. After that was dry, I took a 2" disposable brush and carefully worked in Denatured Alchohol. This was to re-flow the finish as much as possible. (I didn't do too much on the decal area.) When that was dry I used a fresh brush and brushed on a coat of white shellac to fill in the gaps. It took a lot of fiddling around and touching up areas with color to hide damage and missing or thin finish, but with subsequent coats of shellac, it became pretty respectable. From what I can see of your decal, it might be salvageable. It's worth trying in that you can't really ruin it. If you pull it off, then you have a largely original machine. At worst you can always refinish it. ** OK, I'm done cheerleading  In any case, good luck. You're doing a great job! Martin |
|
|
|
Post by tarheeltinkerer on Feb 11, 2009 20:50:47 GMT -5
Martin,
I cleaned the bedplate with naptha and Formula 409. After this I applied a layer of basic carnuba Turtle Wax to give it a shine and seal the metal in spots from surface rusting. The diaphragm is copper on the remains of this reproducer. I MAY attempt to rebuild it, but note this is a BIG may. We shall see. If it is cheaper to just get an H reproducer repro, I may do this.
As for the case, I used some simple furniture cleaner/oil and lightly wiped some surface grime off the case bottom and bed frame. I then took some 0000 steel wool and tried to remove some white paint streaks from the bottom sides of the case. Most of it came off, but it looks like some of the really tough spots will require more. I see your point on not refinishing the case, and I am going to take this advice. A friend who is a carpenter and restores Columbia and Victrola phonographs is going to help me repair a crack in the front (by the horn attachment slot) and give me hands on guidance for refinishing the case. A nice evening of the shellac, followed by some new coats should restore it just nicely. Since I've letter the original bedplate finish alone, it makes sense to leave the decal alone. Really I just want this player to be clean and functional, but not restored to like new. I'd rather it show the age and its character as such.
|
|
|
|
Post by martin1 on Feb 11, 2009 21:12:02 GMT -5
Hi Frank! I had a Model H that was in a similarly incomplete. George Vollema did the rebuild for me which ended up being ever so slightly higher than buying an original one that was already rebuilt. (I know it's crazy, but I wanted to keep the original one with the machine.) In either instance, I'd recommend getting in contact with him for a replacement or a rebuild. He does excellent work. I may be wrong but I don't that the repros end up going for much less money than the originals. www.victroladoctor.com/I think you'll be surprised how good you can make the old finish look by obsessing on it over the course of a few days. The main thing you want to watch out for is any wax or oil on the original finish. Wiping it down with paint thinner will dissolve the wax. Just be sure that it have a chance to dry before using the alcohol. Good luck, and keep us posted on your progress! Martin |
|
|
|
Post by tarheeltinkerer on Feb 11, 2009 22:42:03 GMT -5
Howdy Martin,
Many thanks for the info. Honestly, I don't know if I have the top of an H or a C. The serial number on the reproducer is A90?7924. The ? may be a 4...it has a triangle resemblance. Other than this, it is just the top, and locking ring for the diaphragm, and the worn diaphragm. I need the tail weight, screw, and stylus first.
As for the finish, again, I'm going to take it to my friend the carpenter (who is going to repair a crack in it) and see what he recommends. He's restored around twenty phonograph cases, so he has 19 up on me, haha.
Cheers,
Frank
|
|
|
|
Post by martin1 on Feb 12, 2009 0:14:38 GMT -5
As far as I can tell those are very triangular 4s. I keep running into those. I've asked many people and they all seem to agree that the Edison factory freely interchanged the reproducer tops. It's probably a coin toss as to what it was, so it really depends on what you want it to be. Realistically, it might be cheaper keeping it as-is in the case and just buying a replacement for daily use.
Good luck!
Martin
|
|
|
|
Post by matty on Feb 12, 2009 3:17:03 GMT -5
The Model H will have the serial number stamped right at the base of the horn connector, and a C will have it on the main domed body of the reproducer. The same is true for the 2 & 4 min recorders.
At lease, this is true of all the original examples I've seen & owned.
My model K also has the number at the base of the connector, but I haven't examined any other K's in person.
BTW: I'm not sure if the late 2M's made after the H's retained the number on the dome or not. Most of the C's I've seen have had mica diaphragms.
|
|